Thursday, July 31, 2025

August Challenge ~ organizing

Nope, I didn't meet my July challenge (which was a repeat of June's challenge!) - things just got too hectic and I didn't make time for myself to walk for an hour 4 days a week. I got all my steps in and more but not an official 'workout'. So I'm letting this one go for now until I get the house organized. 

This month my challenge is to unpack all the boxes from our move, I'm trying to incorporate a whole condo worth of stuff into our already full house here in Michigan! There are boxes everywhere, I mean literally everywhere, and our clothes are hanging from the car lift in the garage - I have so much stuff I'm pretty  sure I could open a store haha. I took 3 carloads to a garage sale my niece held last weekend, and many carloads to Goodwill - and I still have boxes everywhere. The chaos is making me so anxious!

I don't know how this August challenge could benefit you, but chances are you also have things that need to be sorted and dealt with - so if you're up for it and don't want to try the walking challenge again (for now, I'm just tabling that one until I get my life back LOL), maybe you also want to commit to getting things put away this month!


7.31.24: thru the years

7.31.23: watch strap loops

7.31.22: ðŸ”¥ week 31

7.31.21: Al's baked beans (re-run)

7.31.20: album cover t-shirt

7.31.19: mexican street corn salad

7.31.18: freezing pesto

7.31.17: boho earrings 

7.31.16: Al's baked beans are the best!

Wednesday, July 30, 2025

Watermelon "Sushi" (re-run)

I posted this watermelon appetizer that Mary shared with me in 2018, time to look at it again!

Here's the original post titled "Sushi-Not Sushi":

BFFE Mary sent me this and I cannot wait to make it - it's been so hot lately this watermelon appetizer sounds like the perfect refreshing bite (not to mention look how pretty it is, and so easy!). She made it twice in two days and it was totally gone both times - she said everyone thought it was ahi tuna (that's where the "sushi not-sushi" name comes in hahaha).


On top of watermelon chunks (you can buy watermelon already chunked up but that's more expensive than doing it yourself, your call), pipe or spoon goat cheese whipped with a little lemon juice and zest. She usually tops that with basil but this time she was out of basil so substituted a blueberry (hey, another great idea for the 4th of July or other patriotic holidays!) and then drizzled with pomegranate vinegar (she found that at her local specialty store - you can use any balsamic or balsamic reduction). How good does this sound?! Thanks for sharing, Mary!

7.30.24: thru the years

7.30.23: ðŸ”¥ week 31

7.30.22: angry balls cocktail

7.30.21: harvey wallbanger

7.30.20: beef wellington

7.30.19: tt - guacamole toast

7.30.18: road trip bracelets

7.30.17: spinach, beet, goat cheese salad

7.30.16: harvey wallbanger


Tuesday, July 29, 2025

Tip-sy Tuesday: Pitting Cherries Hack

I read this tip somewhere about pitting cherries if you don't have an actual pitter - I love cherries but don't feel the need to own a pitter for the handful of times I need to remove a bunch of pits. So the next time I make a pie or tart or just require a large amount of pitted cherries I'm going to try this! Seems like it should work, let me know if you try this (or have tried it) and what you think.

Place the cherries one at a time on top of an empty glass bottle and use a metal straw or chopstick to push each pit into the bottle. 


7.29.23: words

7.29.22: golf banquet

Monday, July 28, 2025

Mosaic Stepping Stone (re-run)

This is the first and only mosaic stone piece I've made, I posted it 6 years ago and it's still going strong at our campsite (I don't use it any more to hold down the carpet, it's propped against a tree), I still love it.

Here's the original post from 7/2019 in case you want a refresher:

I've had this kit hanging around for a couple years now, tried to get Brooke to make it with me last summer but we never got around to it; my plan is to use this at the campground to hold down the rug that keeps flapping around. I've never made a mosaic stepping stone before, I followed the directions closely and it went pretty much according to the instructions although I do have a couple more tips to share.


1. In addition to the supplies they provided in the box - which amounted to the cement mix, a wooden writing tool (I laughed at that one, it's a popsicle stick!), a wooden mixing paddle (basically a paint stir stick), broken bits of colored glass, and the plastic mold - I used a 5 quart bucket, disposable gloves, and wore an apron to protect my shirt in case this project ended up being messy. After reading the warnings to avoid breathing in the cement dust I tied a bandana around my face and wore my glasses just in case. Really, all the warnings were making me a little nervous but this is supposed to be a kid friendly project so I just protected myself the best I could as a precaution. Also, you'll want to put down some paper to protect your surface.

2. The directions say to stir in 2 cups of water, then adjust the water as necessary for the mixture to be the consistency of cookie batter. Well that confused me - like what kind of batter are we talking because there are many different cookie batter consistencies! HA!. Turns out I think I might have went with a drier cookie batter and the cement started setting up before I realized it. But it still turned out so I'm good.


3. Before mixing the cement I wanted to make sure I knew exactly what I was going to do with the glass bits. First, I traced the shape of the stepping stone mold on some cardboard, then played around with where I wanted the glass mosaic pieces to go. That of course took a long time because I couldn't decide what pattern I wanted to make! Once I had what I thought looked good I mixed the cement and poured it into the mold as directed. So far so good.


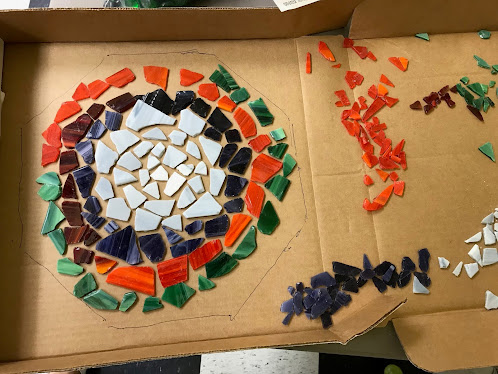
4. Didn't really think about how I was going to transfer the pieces from my mock-up to the actual stone. Fortunately I took a picture of the practice piece - that helped give me an idea where I wanted the spirals to go but when moving them to the stone the angles got changed and all the sudden it wasn't like I practiced! That's when I realized the mix was setting up - uh oh!

5. To place the pieces on the cement without getting the mix all over my hands I wore a disposable glove on my left hand, picked up a piece with my left hand and placed in on the mix then using my right hand and the "writing tool" (aka: popsicle stick) I guided the piece in place (having a glove on my right hand was too hard using the stick).

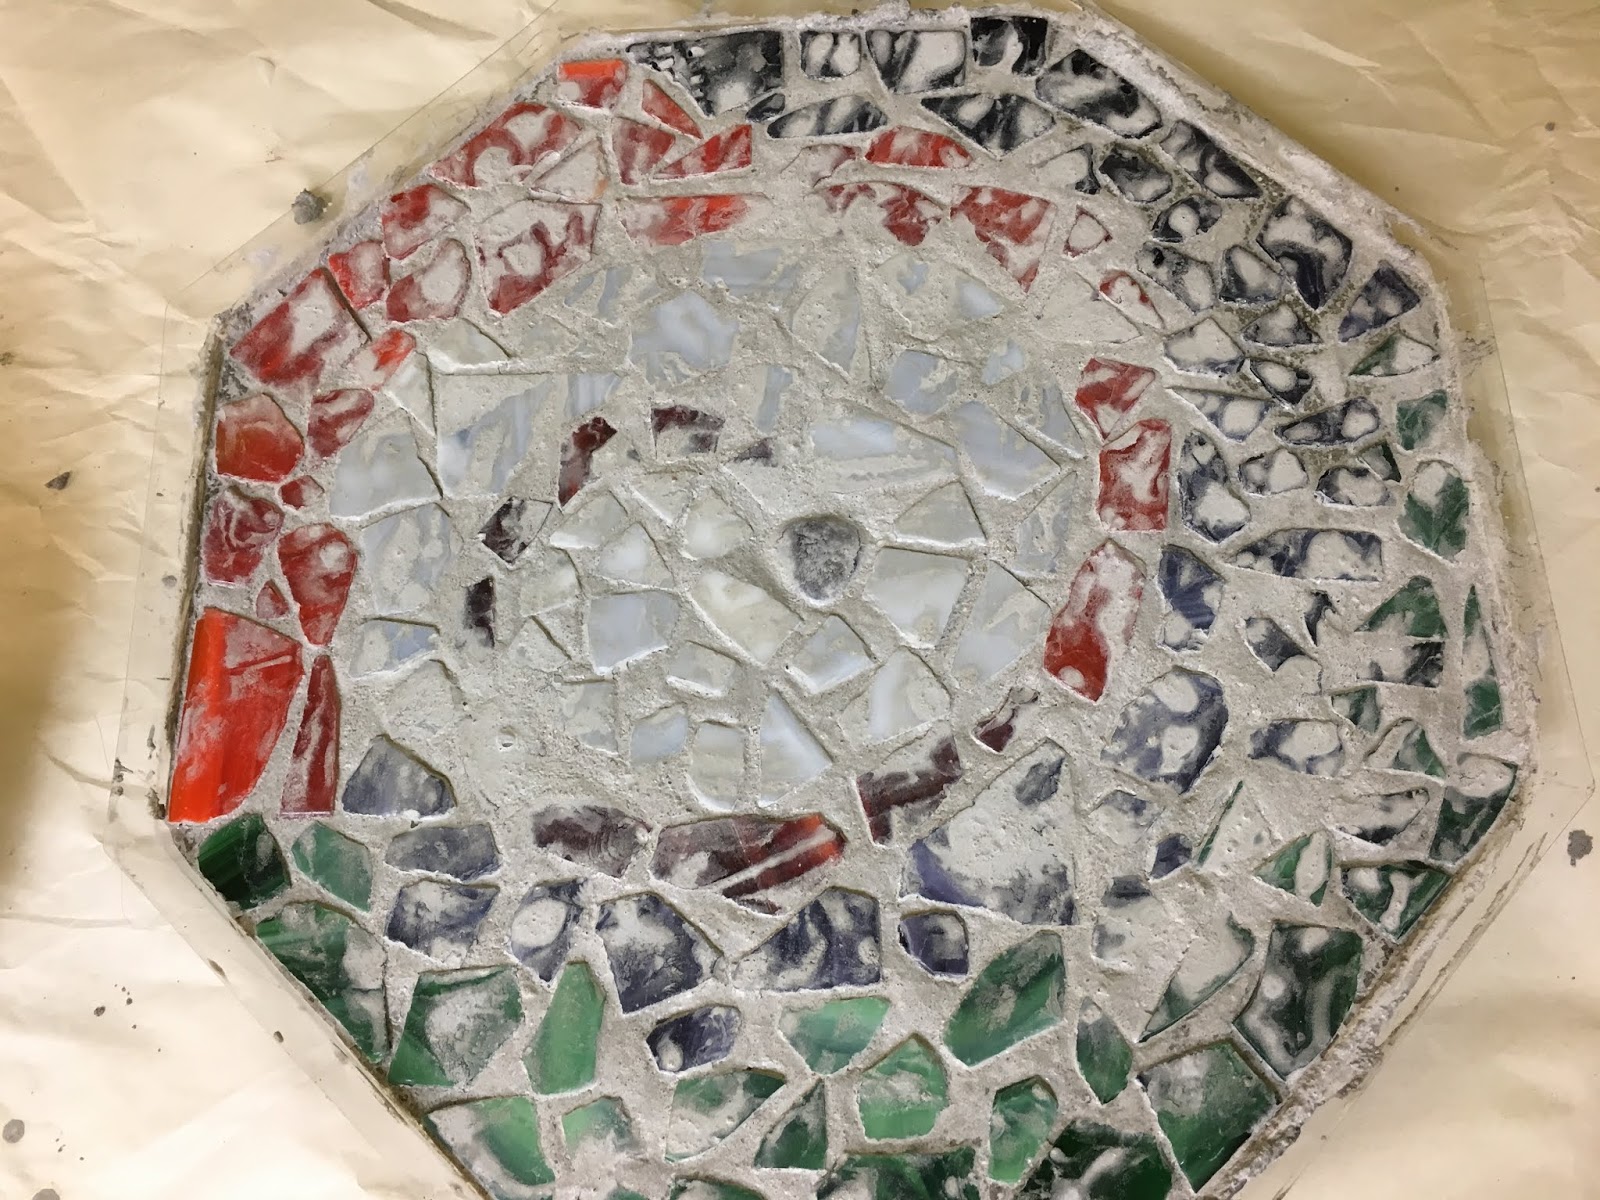
6. Once I had all the pieces transferred from the mock-up cardboard to the stone there were some little spaces where I added small bits of glass to fill in. Once the glass pieces are all in place I put on both gloves and pressed the pieces down into the mix - that released some liquid from the mix but it's ok, once it dries you wipe it off with water.


after drying overnight, use an old toothbrush and water to clean the front surface.
Don't remove from the mold for 24 hours.

after 24 hours, remove from the mold and wash with dish soap


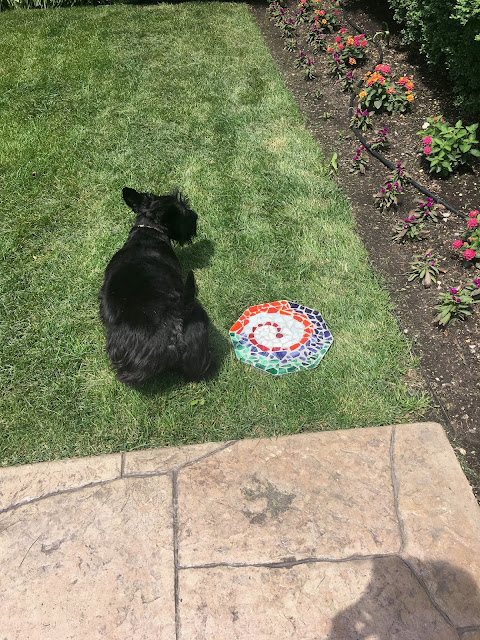
That dog! I'm pretty sure he was going to pee on my new stone,
but at the last minute he lifted his left leg on the grass instead - insert eye roll


7.28.24: ðŸ”¥ week 30

7.28.23: MSTI: ice cream?

7.28.22: MNIH: chicken stuffed crescent rolls

7.28.21: old fashioned ham salad

7.28.20: tt - float anchor

7.28.19: ðŸ”¥ week 30

7.28.18: blue cheese stuffed olives

7.28.17: jilly's jam - strawberry peach freezer jam

7.28.16: framed words


Sunday, July 27, 2025

🔥 Around the Campfire (week 30)

Dear Campers ~ 

Here's a quick recap in case you missed anything at camp last week:

Posts ~

7/20: 🔥 week 29

7/21: fleece no-sew pillow (re-run)

7/22: TT RV blackout shade tip

7/23: strawberry peach freezer jam (re-run)

7/24: berry-topped bundt cake (re-run)

7/25: twine-wrapped mason jars (re-run)

7/26: words (my favorite drink) 

That's it for this week! See you next week for more projects, crafts, recipes, whatever we can think of to make at camp - bye :)


Sincerely ~

Jill
camp counselor


Saturday, July 26, 2025

Friday, July 25, 2025

Twine-Wrapped Mason Jars (re-run)

I made a couple of these 8 years ago, one for the display table I used to style for Ronda's card studio - I have no idea but if she didn't keep it that's ok (8 years is a lot to ask someone to hold on to a jar hahah) - I filled the other one with sand and a votive candle and we still have it at the campsite. It's cute!

Here's the original post from 7/2017:

When we decided on a beach theme for Ronda's seasonal display table I immediately thought about those cute net wrapped mason jars I see everywhere - in fact when I showed my sister the one I ended up making and told her she needed one she replied "yep, I own that. except I bought it". Well where's the fun in that haha? So I wanted to make one - did a little internet searching and ended up sort of following the directions I found here. Wasn't hard at all, you only need twine and a jar (and scissors) - I took lots of pictures to show you the process, if you need more directions click on the above link and see if her instructions help.


Directions:

1. Wrap a piece of twine around the top of the jar with a little extra to tie off. Lay it out on the table.


2. Cut 10 lengths of twine that are 32" each. Fold in half, put the loop under the short piece of twine that will go around the top of the jar, then feed the two ends thru the loop and pull tight. Repeat with all ten long pieces, space them out on the short piece, then tie the short piece around the top of the jar.


fold 32" piece in half and put under the short piece

bring the two ends up over the short piece and thru the loop, pull tight

repeat with all 10 long pieces, space them evenly 

then tie the short piece around the top of the mason jar. with the 10 knotted pieces hanging down


3. For the first row, knot two lengths of twine together about 1" down from the top. Repeat the whole way around. For the second row continue knotting 2 lengths together making a diamond pattern. Repeat each row until you get to the bottom of the jar - note you are creating a net of sorts and it will stretch, once I got towards the bottom I turned the jar over and stretched the twine to see how many more rows I needed. Once you have created enough net to cover the jar tie all the little ends together underneath the jar, try to make them somewhat even so the jar will sit straight when upright.
  
take two lengths and tie them together about 1" down from the top

 repeat around the jar to make the first row.

repeat for each row


stretch the net a bit until it looks right and is long enough to be able to wrap around the bottom

then start knotting all 20 of the ends together to hold the net in place.

try to space the knots so they aren't all on top of each other in one place so the jar sits flat and not all wobbly. 

4. Trim off any tails - you could finish this with additional twine wrapped around the top of the jar if you want. 

For Ronda's table I filled them with paper spider mum flowers; sand, shells, a candle, etc. would look good too!

I found some instructions here at itallstartedwithpaint.com 

7.25.22: star plates


Thursday, July 24, 2025

Berry-Topped Bundt Cake (re-run)

This post is from 2018 - I never did get details from my sis but I do remember that the small side cake I made for Dave and I was delicious! And it's so pretty - it's time for me to make another one for sure (and I won't give it away this time so I can take pictures and update this post!).

Here's is the original post from 7/2018:

I've been wanting to make this recipe for a while now but didn't have anyone to give it to and Lord knows I do not need to eat an entire berry cake...my sister went up north over the weekend to her sister-in-laws so I very nicely offered to send her with a cake (haha, it was way more self-serving than being nice but don't tell her that). My only request was that she please take a picture of it after it was inverted and sliced...and guess what? Yep, she's lame. She got a delicious fruit-topped pink-swirled bundt cake and I did not get any pictures. Sigh. Sisters.


Fortunately I had the foresight to take out some of the dough and bake a small 4" cake so I could taste it and see if what a keeper recipe - and I took a picture of it, so at least I have something to show you!


I'm worried that there was so much fruit on the top and it was SO juicy after it baked that the cake might break apart - once again my sister is lame and she hasn't told me if it made it there in one piece. So let's go with it arrived in perfect condition :). I know it tasted good - and that's all I know for sure LOL!


I found the recipe here on bhg.com and they have a photo on the website. Not sure if I can post their photo tho so you'll either need to trust me that this looks pretty (bundt cake with fruit baked into the top) or go to their site and look for yourself. There is a pink swirl of cake batter running thru the cake (at least it is in their picture, I have no idea if mine turned out that way - credit my sis for that); you get that by removing some batter before pouring it in the pan and add melted jam to it, then layer cake batter with pink batter and more cake batter. Easy to do and I'm sure the effect was pretty.

I'm copy and pasting their exact recipe because it's long - don't let that stop you from making it tho, it's worth it. The original recipe calls for raspberries and cranberries - I used raspberries and blueberries. Yum.


INGREDIENTS

BERRY TOPPING

CAKE BATTER

  • 1 1/2cups unsalted butter, room temperature
  • 2 3/4cups granulated sugar
  • 6large eggs, room temperature
  • 3cups all-purpose flour
  • 1teaspoon ground cinnamon
  • 1teaspoon salt
  • 1cup sour cream, room temperature
  • 1tablespoon pure vanilla extract

SWIRL

  • 3tablespoons seedless raspberry jam, melted
  • 3 - 4drops red food coloring


  • confections' sugar for dusting

    DIRECTIONS

    FOR THE TOPPING:

    1. Preheat oven to 325 degrees F. Liberally spray a 12-cup Bundt® pan with non-stick baking spray or prepare with shortening/butter and flour. 
    2. Add melted butter to bottom of the bundt pan then cover butter with 3/4 cup of the brown sugar. 
    3. Evenly sprinkle cranberries, raspberries and pomegranate seeds over the brown sugar covering entire area then carefully pat down inside the pan. 
    4. Cover berries with the remaining 1/4 cup of brown sugar.

    FOR THE CAKE BATTER:

    1. In your mixer bowl, add butter and beat on high speed for 1 minute. Slowly add in sugar and mix on high speed for an additional 5 minutes until very pale yellow and fluffy.
    2. Next, add eggs, one at a time, combining well after each addition and scraping down the sides as needed.
    3. Whisk together flour, cinnamon and salt in a medium sized bowl. Turn your mixer down to its lowest speed, and slowly add flour mixture into batter in two increments. Be careful not to overbeat.
    4. Lastly, add sour cream and vanilla extract, scrape down sides, and mix until just combined and turn off mixer.

    FOR THE SWIRL:

    1. Remove 1 cup of cake batter from mixing bowl and add to separate small bowl. 
    2. Stir in melted raspberry jam and red food coloring and whisk until smooth.

    TO ASSEMBLE:

    1. Evenly spread 1/3 cake batter into bundt pan over berries then add 1/2 of swirl batter over the top. 
    2. Repeat step by adding 1/3 of cake batter and remaining swirl batter on top. 
    3. Finally, add remaining 1/3 of plain batter to the top.
    4. Bake for 1 hour and 15 to 25 minutes or until toothpick inserted into the top of cake comes out clean. Tip: Add a sheet of parchment paper or foil on a shelf below the bundt pan to catch any juices that may drip during baking.
    5. Remove cake from oven and cool for only 5 to 7 minutes in pan. Carefully invert cake onto serving plate to finish cooling. If any berries stick to pan, carefully use a butter knife to remove and place back on the top of the cake. Let the juices settle (to speed this process you can refrigerate).
    6. Garnish with a small sprinkling of powdered sugar, if deisred.


7.24.24: baked boneless chicken thighs

7.24.23: reusable kitchen sponges

7.24.22: ðŸ”¥ week 30 

7.24.21: Cathy's peach cobbler

7.24.20: tuna cauliflower salad


7.24.16: Nuremberg

Wednesday, July 23, 2025

Strawberry Peach Freezer Jam (re-run)

I posted how to make strawberry peach freezer jam (aka: berry-peach screech) a long time ago and haven't made it since. I bought some excellent stawberries at the grocery store and have a hankering to make this again!

Side story - LeDonna called me because she had a jar of jam given to her and she wondered if she could put the glass jar in the freezer; miss know-it-all here told her I wouldn't because I'd worry about the jam expanding once frozen and potentially breaking the glass. Uh...and then I read my own post about freezing jam in glass jars 🤦‍♀️ doh! 

Here's the original post from 2017:

It's too blasted hot outside to feel like standing over the stove canning jam - but strawberries were on sale and the peaches I just bought are so good and sweet that I really wanted to make jam...so I did the next best thing and made Berry Peach Screech freezer jam this time! This is a small batch recipe which I love (some times I really question making like 12 jars of jam for just me!), this makes 4 half-pints.


Why the name "berry-peach screech"? 'Cause making up cute jam names is half the fun of making jam! My last one was "so good it's scary blueberry" - click here for that post.

Did you know you can freeze in canning jars? I did not. So for this experiment I did 2 in glass and 2 in traditional plastic square containers. I made this a couple days ago and the jars are doing just fine in the freezer (I keep waiting for them to crack!), just make sure to leave about 1/2" space at the top before putting on the lids to account for expansion during the freezing process.


3 cups mashed strawberries (about 1 1/2 pounds fresh berries)
1 ripe peach
1 cup sugar
1 1/2 teaspoons fresh lemon juice
1 teaspoon vanilla extract
4 Tablespoons instant pectin (I've never worked with this before, it comes in a small round container. make sure it's the kind intended for freezer jams or heatless recipes).

  1. Wash, hull, and coarsely chop the berries, then mash with a potato masher. I like to leave chunks so don't smash it to smithereens. Peel, pit, and chop the peach into small pieces.
  2. Combine the berries, peach, sugar, lemon juice, and vanilla in a large glass bowl. Stir well and let stand until berries have released some of the juice, about 30 minutes. 
  3. Add pectin 1 Tablespoon at a time, stirring until well combined after each addition. Let stand 5 minutes to activate the pectin.
  4. Spoon jam into clean, wide-mouth, half-pint jars, leaving 1/2" headspace. Wipe rims clean with a damp paper towel. Loosely apply clean lids, label the jars, and set in freezer.
  5. Tighten the lids once the jam is completely frozen. Store in the freezer up to 1 year or in fridge up to 1 month.

37 calories per 2 Tablespoon serving

It didn't set up as firm as cooked jam, but not super runny either (when that happens we call it "ice cream topping" and still enjoy it!). I did spoon it over vanilla ice cream last night and also put it on my english muffin with peanut butter this morning. The stuff is good!

Tuesday, July 22, 2025

Tip-sy Tuesday: RV blackout shade tip


There is at least an inch gap when the shades are down in our RV, letting in a lot of light in the morning. I put up some clips on the window frames to hold the sides of our blackout shades closer to the window so there isn't so much light coming in - these have made a huge difference! They are Command hooks meant to hold a strand of lights (like for Christmas or hanging outdoor lights or whatever), they're clear with clear adhesive tabs so they go away as much as possible on the window frames. Super happy with the outcome! 


7.22.24: pop tab earrings re-run

7.22.23: words

7.22.22: loaded tater tots

7.22.16: passau, germany 

Monday, July 21, 2025

Fleece No-Sew Pillow (re-run)

I came across this pillow when packing up the condo - I had put it away so good that I forgot about it, when I found it I thought to myself that it's too cute and I should share again! This was very easy to make, obviously you can put whatever letters/words/shapes on it you want - I just enjoy "Long Time No See" in the guest room. 

Here's the original post from 2016:

Have you made a no-sew fleece tie blanket? I love them, they make great gifts and it's a project that anyone can do...and there are like a billion choices of patterns at the fabric store! That part is overwhelming for sure - choosing 2 coordinating fabrics takes me forever. Anyway, I thought using that technique and making a throw pillow for the guest room would be a fun easy project and it turned out really cute. I wanted to put felt letters on the front so got white fleece to put them on, and a striped pattern that matches the room for the backside. I cut out letters L,T, N, S - which stands for "Long Time No See" from different colors of scrap felt I had on hand, I used 2 different colors and sizes for each letter but it would be just fine with only one.


You'll need:
  • pillow form - whatever size you want. Mine is 11"x15"
  • 2 pieces of anti-pill no-sew fleece (note: my fringe is 4" so whatever size pillow form you get you'll need to add 8 inches in length and width to look like mine. If you get a larger pillow form you might want longer fringe so plan accordingly. My fabric is 19"x23")
  • scissors, ruler
  • cutting mat and fabric rotary cutter, optional
  • felt (if you want to make letters for the front) that matches the fleece fabric.

Instructions:

Cut out and remove a 4 inch square from each corner, then make 4 inch cuts every inch, along all 4 sides. I like to cut thru both pieces of fabric at the same time so the cuts exactly line up, but you can do the pieces separately if you want - sometimes the double fabric is really thick and hard to cut thru at the same time. I lay a long tape measure or yardstick along the fabric for a guide to make the cuts every inch, or you can just wing it and guesstimate where an inch is - it does not need to be exact.  

If you are putting letters on the front, cut out the size and colors you want, and sew or glue them on the front fleece fabric. You can use a stencil or print off the letters the size you want and trace around them - or free hand it. I made big bubble letters in two sizes and laid them on top of each other for a layered letter, the bottom letter is 5.5" and the top one is 4.75". 

Lay the fabric front and back on top of each other right sides out, line up the fringe strips top and bottom and then tie them together to form the pillow case. Do three sides and then insert the pillow form, then finish the last side to encase the pillow form.

I also glued on some little shells because I can't leave anything alone, it must have more decoration haha. It looked fine without, but I couldn't help myself...


Sunday, July 20, 2025

🔥 Around the Campfire (week 29)

Dear Campers ~ 

Here's a quick recap in case you missed anything at camp last week:

Posts ~

7/13: 🔥 week 28

7/14: thru the years

7/15: TT red onion tip

7/16: thru the years 

7/17: thru the years

7/18: thru the years

7/19: words (follow that path)

Well, once again, this week got away from me and there was NO time to craft or cook or anything! Yikes. I spent most of the week unpacking our things from the condo and let me tell you - we have way too much stuff and no room to put all the new additions! I have a feeling there will be more 'how to downsize, organize, and get rid of things' posts in my near future LOL

So that's it for this week - a bunch of posts about what's happened in years past! See you next week for (hopefully) more projects, crafts, recipes, whatever we can think of to make at camp - bye :)


Sincerely ~

Jill
camp counselor


Friday, July 18, 2025