Pages

Monday, June 30, 2025

Star Plates (re-run)

It's still going to be a crazy busy week so I'll do a few more repeats for Fourth of July ideas. 

Here's one for painting star plates from 2022:

Brooke and I used to go to the 'paint your own pottery' place all the time, one visit we made these fun star shaped plates and since there's a little technique involved I thought I'd share how we made them.

They both use similar techniques to make the pattern so clean (cuz there's no way either one of are free- handing stripes or stars this perfect haha!!). In both of these examples you start with a couple coats of white paint all over the plate, let it dry completely before decorating. 

To make the stripes: simply put tape over the area you want to stay white and paint in between with the color of your choice. Brooke went with yellow stripes, I went with a flag theme and painted my stripes red. If you want the stripes to be more solid add a second coat of paint. Let dry and peel off the tape.

For the stars (or whatever shape you want) cut or punch out the shape from paper in the size you want. B went with large stars and I went for small. Lightly dampen the paper shapes and stick in place. For the pink and yellow plate Brooke left tape over the last white stripe towards the middle and painted one coat of pink over the paper stars (make sure the paper stays stuck down or else the pink will bleed underneath. For my flag plate I put tape over the stripes to keep the blue paint from covering any of the stripes and keeping a nice sharpe line, then fill in that area with blue paint (the navy paint had the texture in it already, I didn't add it). Once the paint has dried very carefully pick the paper stars off using a pin or sharp pointy object. When you remove the paper you'll reveal the crisp white star shape. 


Finish according to the instructions at the pottery place - don't forget to sign your piece! 


6.30.24: 🔥 week 26
6.30.23: msti: oven s'mores
6.30.22: patriotic gnome
6.30.21: hermits
6.30.20: tip-sy tuesday: tension rods
6.30.19: 🔥week 26


Sunday, June 29, 2025

🔥 Around the Campfire (week 26)

Dear Campers ~ 

Here's a quick recap in case you missed anything at camp last week:

Posts ~

6/22: 🔥 week 25

6/23: brownies for the 4th

6/24: button flags

6/25: tomato, mozzarella, blueberry salad

6/26: flag luminary 

6/27: paper fireworks

6/28: words (freedom rings)

That's it for this week! See you next week for more projects, crafts, recipes, whatever we can think of to make at camp - bye :)


Sincerely ~

Jill
camp counselor

6.29.24: words  (older woman)

6.29.23: french fries by Macey

6.29.22: quinoa and sweet potato bowl

6.29.21: sewing tip


Friday, June 27, 2025

Paper Fireworks re-run

This is a repeat from 2017:


I'm working on making things for Ronda's seasonal display table (click here  for Halloween and here for Fall), we're doing a "beachy" summer theme and I'll show you all the fun things I've been making for her in the next few posts. While making some pretty paper flowers I thought how much they looked like fireworks if I used red, white, and blue paper - they'll be perfect for Fourth of July decorations.


Starting with a 3.5"x8.5" strip of cardstock, fringe one long edge with fringing scissors (or just make thin cuts the entire length with sharp scissors). Tightly roll up the strip, run some glue (I used a glue stick) along the last one inch of end so it'll stay coiled up. Pull the fringe down, slightly curving it with your fingers as you go so it pulls apart and looks like a paper pompom. Add a drop of glue to the underside of the coil then insert a wooden skewer. Done. I did the flowers a little differently and will share that later (click here to see the spider mum post). 


Thursday, June 26, 2025

Flag Luminary (re-run)

 Another easy quick craft for the Fourth - aren't they cute? All you need is a big jar, a small flag, mod podge, rope for around the top, and glitter (glitter is optional I suppose, but it's glitter - why wouldn't you add it if you have it?!).


As you know, I'm an instant gratification kinda crafter and will find things in my house that will "do" when I see or think of a project that I want to make - I saw the idea for these luminaries online but changed it a bit to use the things I already have and put it together a little differently. So I'm using a large clean pickle jar (I have them left over from making the very very best yummiest pickles - click here for that post) with the label removed, a 6x4" cheap little flag that is wrapped around a dowel, matte finish mod podge, and white glitter.

Slide the flag off the dowel and cut off the part that was folded - you want the flag to lay flat. I liked the edges all jaggedy so I cut a thin bit off the other end and unraveled it a little to match. Brush a thin layer of mod podge onto the jar where the flag will go, apply the flag, then brush another thin layer of mod podge over the entire flag. Make sure there is mod podge under the entire flag since it's acting as glue to keep the flag in place. Smooth out all of the bubbles (I use my fingers, then wash my hands before the glue dries), and let it dry 15-20 minutes. Apply a second coat of mod podge and sprinkle with glitter. Let dry. The mod podge dries clear but you can still see it on the glass so I took a wet paper towel and something with a sharpish edge (uh, that'd be my fingernail) and cleaned up around the flag so the mod podge was a little neater looking.

To finish wrap rope around the top using a little dab of hot glue to hold it in place. Once everything is dry I put some sand in cuz I like how it looks, and a votive candle (use a tealight if you made this with a smaller jar).

Note: initially I was going to make this with a Mason jar but realize the flag isn't going to stick as good or be smooth because of the raised imprint on the Mason jars.

I re-use paper or styrofoam plates when I have small painting (or in this case mod podging) projects

the white piece in the middle is what was holding the flag to the dowel that I cut off.

mod podge goes under and on top of the flag

after applying a second coat of mod podge sprinkle with glitter

the glitter looks really pretty with the candle lit - it's all sparkly and having this outside at night is going to be so nice!


Having trouble linking the source for this idea - I found it at A Little Craft In Your Day.

6.26.23: drink cozy 

6.26.22: 🔥 week 26


Wednesday, June 25, 2025

Tomato, Mozzarella, Blueberry salad

 This is one of my favorite summer salads, and it's the perfect salad to make this first week of July (very patriotic red, white, and blue!) - just add blueberries to some halved cherry tomatoes and small bites of fresh mozzarella (I found some very small bite-sized balls at the grocery store, if you can't find those you can cut up a larger ball), drizzle with a little olive oil and balsamic vinegar, season with salt and pepper. A traditional Caprese salad has fresh basil but I didn't have any on hand and we didn't miss it. Yum, love this dish!


Tuesday, June 24, 2025

Button Flags

I'm going to be very busy the next few days so am not going to have time to make or bake anything to share with you - instead of doing the usual 'Thru the Years' posts tho I'm going to do some reruns of things to make leading up to the Fourth of July; today it's this really fun kid (or adult!) craft idea making button flags.

Here's the original post from 2018:

My friend Lisa loves crafting with her nieces (she calls them "the littles" awww), she put this on Facebook and I asked if I could steal it to share with you guys - how cute is this idea? Here's her notes on how they did it:


Had the littles over and we made the American Flag! You can see each one has there own style! As my niece said “there is no right or wrong way in art”! She is 5. Out of the mouths of babes! Oh I treasure them.

I bought the burlap canvas at Hobby Lobby, bought the buttons on Amazon. Used tacky glue and some patriotic ribbon to hang up or not. I just free hand the outline for a guideline for them and the kids where off running with it. 

6.24.24: small crocheted owl basket 


6.24.23: words
6.24.20: bluebarb pie (rhubarb blueberry)
6.24.16: travel blog - 2nd day at Goodwood

Monday, June 23, 2025

4th of July Brownies

I'm going to be very busy the next few days so am not going to have time to make or bake anything to share with you - instead of doing the usual 'Thru the Years' posts tho I'm going to do some reruns of things to make leading up to the Fourth of July; first up is this easy idea for Patriotic brownies.

Here's the original post from 5/2021:

Going to my sister's today for a Memorial Day get-together, I initially said I'd bring deviled eggs but she said if I wanted blog post ideas she had a couple recipes she'd been wanting to try (more like wanted me to make for her hahaha). Sure, I always like to make new things so I can blog about them and share with you! One is for peanut butter cheeseball and the other for a wedge salad dip thing - since neither of those are very patriotic for the holiday I decided I'd also make some easy brownies with lots of red, white, blue, and silver star sprinkles. If you're looking for a quick dessert idea for this weekend check these out!


I cut a standard 8x8" pan of brownies into 16 pieces and then cut some of those in half - you know there's always too much food at a dish-to-pass picnic so I figure some smaller bites of brownies will be a good option for people.

I've been pre-slicing and individually portioning desserts for the past year to help spread the (sugar) love and not germs! 


6.23.24: 🔥 week 25

6.23.23: MSTI caramelized banana v.2

6.23.22: MSIH alice springs chicken


6.23.20: TT at home gel nails

6.23.19: 🔥 week 25

6.23.18: houseplants


Sunday, June 22, 2025

🔥 Around the Campfire (week 25)

Dear Campers ~ 

Here's a quick recap in case you missed anything at camp last week:

Posts ~

6/15: 🔥 week 24

6/16: paper flower arch 

6/17: TT pallet photo holder

6/18: chicken stuffing casserole 

6/19: taco rice

6/20: 2-pasta pasta salad with vegetables 

6/21: words (how to dance)

That's it for this week! See you next week for more projects, crafts, recipes, whatever we can think of to make at camp - bye :)


Sincerely ~

Jill
camp counselor


Friday, June 20, 2025

2-Pasta Pasta Salad with Vegetables

I hosted book club Monday but we were up north the whole weekend so I needed to make a dish that I could start in the camper and finish when we got home Monday afternoon. It's basically a "boil some pasta and throw in whatever veg you want" kinda recipe! Another of my non-recipe recipes haha. Andddd I forgot to take a picture - it looks like pasta with vegetables in Italian dressing, sorry! I will make it again and update when I do!

Change as you see fit - this is what I did:

  • 1 package dried 3-cheese tortellini, cooked al dente
  • 1 box mini bowties, cooked al dente
  • asparagus stalks (I used a handful), blanch in boiling water for 2 minutes then run under cool water to cool, chopped into bite-sized pieces
  • 1 small bag frozen corn, thawed (note: I put the corn in a colander and pour the hot water from the pasta over top of it)
  • marinated grill artichokes, cut into bite-sized pieces, save the liquid
  • marinated small mozzarella balls, quartered, save the oil
  • cherry tomatoes, halved - as many as you want
  • chopped green onion stems (the green part), as many as you want
  • Italian dressing (I love Olive Garden lite Italian bottled dressing
  • kosher salt, black pepper 
Put the cooked pasta in a large bowl; add all the vegetables and toss to combine. Add the oil and seasonings from the marinated mozzarella balls and stir together to combine. Add about 1/2 bottle of the Italian dressing, stir to combine. Season with salt and pepper. Taste the salad and adjust seasonings, add more Italian if needed; I also added some of the liquid from the marinated grilled artichokes. 

Note: this made a LOT of pasta salad, seriously 2 large bowls worth - we loved the salad but it was never ending so I was pawning it off to anyone I saw for the next few days! Fortunately it tasted great since I ate it for breakfast and lunch multiple times!

2nd note: our book was "Friends with Secrets" if anyone is curious. I thought it was ok, it's def readable but I didn't love the plot line - other people really liked it tho.  I'd give 3 ⭐️


Thursday, June 19, 2025

Taco Rice

According to the site where I found this recipe, Taco Rice is a Japanese dish invented in the 80's to appeal to the large American population stationed there, I didn't realize how big our US presence is located there.  We had this for dinner last night and loved it - Dave said to definitely add it to our regular menu list haha. I used ground chicken and a bag of shredded cheddar cheese instead of grating it myself and adding cornstarch as the recipe is written, don't know how much different it is with those substitutions but the cheese sauce was smooth and creamy, and I don't feel like the chicken changed the taco meat at all. Yum!


For the taco meat:

  • 2 T. vegetable or canola oil
  • 1 medium white or yellow onion, finely diced (about 1 cup)
  • 2 medium cloves garlic, minced
  • 1 pound ground beef, preferably 80% lean
  • 1 T. chile powder
  • 2 t. kosher salt; for table salt only use 1 t. 
  • 1 1/2 t. ground cumin 
  • 1/4 t. ground black pepper
  • 1/4 t. smoked paprika
  • 1/4 t. dried oregano
  • 4 t. ketchup
  • 1 cup water
For the cheese sauce:
  • 8 oz. extra-sharp cheddar cheese, grated on large holes of a box grater
  • 1 t. cornstarch or potato starch
  • 1 1/4 cups (10 ounces) evaporated milk
  • 1/4 t. kosher salt; for table salt only use half as much
  • 1/4 t. ground black pepper
  • 1/8 t. smoked paprika

To Serve:

  • 4 cups cooked short-grain white rice
  • 2 cups shredded iceberg lettuce
  • 1 large tomato, halved and sliced
  • salsa, for serving
  • tortilla chips, for serving 
Directions:

for the taco meat:
  1. In a large nonstick skillet over medium-high, heat oil until shimmering. Add onion and garlic and cook, stirring constantly to avoid browning, until tender and fragrant, about 3 minutes. Add ground beef and cook, using a wooden spoon to break up meat into small pieces, until the beef starts to brown, about 5 minutes. 
  2. Add chile powder, salt, cumin, pepper, smoked paprika, dried oregano, ketchup, and 1 cup water. Cook, using a wooded spoon to scrape and stir bottom of the skillet. Bring to a boil over high heat and cook until liquid slightly thickens, about 3 minutes. Remove from heat, season to taste, and cover to keep warm; set aside. 
for the cheese sauce:
  1. In a medium saucepan, toss grated cheddar with cornstarch to evenly coat. Add 1 1/4 cups evaporated milk, salt, pepper, and smoked paprika. Cook on low heat, whisking constantly, until melted and smooth, about 5 minutes. Remove from heat. 
to serve:

Divide cooked rice equally among 4 plates. Top each with taco meat, followed by the cheese sauce, lettuce, and sliced tomato. Garnish with salsa and crushed tortilla chips. 


Wednesday, June 18, 2025

Chicken Stuffing Casserole

I'm not a stuffing lover but this is darn delicious. Really, what more can I say? Well there's the fact that it's very easy to make and other than the baking time it comes together quickly and you can't really mess anything up - and even though the ingredient list is short and simple it's darn delicious. 


for the stuffing:

  • 1 1/2 cups low sodium chicken broth
  • 1/4 cup butter
  • 1 (6 oz) package Stove-Top stuffing mix
for the filling:
  • 1 (10.75 oz) can cream of chicken soup
  • 1 (10.75) can cream of mushroom soup 
  • 1 cup sour cream
  • 1 whole cooked rotisserie chicken, shredded (about 3 cups)
  • 1 (12 oz) bag frozen mixed vegetables, thawed
Instructions:
  1. preheat the oven to 375'. Spray a 13x9" baking dish with cooking spray.
  2. Add the chicken broth and butter to a medium saucepan, and bring the mixture to a boil. Stif in the stuffing mix, remove from heat, and cover. Let stand for 5 minutes, then fluff with a fork.
  3. In a large bowl, mix together the cream of chicken soup, mushroom soup, and sour cream. Add the shredded chicken and mixed vegetables, stir to combine. Pour the mixture into the prepared baking dish, spreading evenly. Top with the stuffing, spreading it in an even layer.
  4. Bake for 1 hour uncovered, until the stuffing is lightly browned and the filling is bubbling. 

Notes:
  • to make ahead of time - assemble the casserole the day before, cover it, and keep it in the fridge. Due to the extra chill from the fridge you will need to add about 10 minutes to the baking time.
  • to freeze - cover the pan with plastic wrap and again with foil. Freeze for 3-4 months. Thaw and bake, adding extra time to account for the chill of the freezer.
  • to store - put leftovers in an airtight container and keep in the fridge for 3-4 days, or in the freezer for up to 1 month. 


Recipe found here at lil luna 

Tuesday, June 17, 2025

Tip-sy Tuesday: pallet photo holder

This is the last post from Cathy's granddaughters open house - I thought this was a fun idea and wanted to share. They stood pallets up around her yard (against a tree, against a rock...) and clipped the photos to twine with mini clothespins and attached to the pallets. I only took one picture but you get the gist...


6.17.23: words

6.17.22: selfie light

6.17.21: pierogi


6.17.18: coincidentally it's a different paper flower.
6.17.17: for real, it's another paper flower! I honestly had no idea and did not do this on purpose!
6.17.16: rock photo stand. whew, 4 years of paper flowers woulda been super weird timing.


Monday, June 16, 2025

Paper Flower Arch

Last of my paper flower posts from helping Cathy with the open house - in addition to making the flowers for the table arrangement, she also made this arch to go over a set of lockers for a photo backdrop area. They attached crepe paper streamers which looked really nice, unfortunately it was quite windy and the streamers flew around - so she taped a few of them at the bottom and let the rest fly. Still pretty!


She made this from cardboard that she spray painted pink, hot glued the flowers and greenery in place, and stenciled on the words. Turned out great!

Click here and here for a couple other posts for paper flower making. 


6.16.24: 🔥 week 24


6.16.21: minty dream cookies 

6.16.20: tip-sy tuesday: toasting pine nuts

6.16.19: 🔥week 24


6.16.17: outfit idea - distressed jeans

6.16.16: scottie topiary


Sunday, June 15, 2025

🔥 Around the Campfire (week 24)

Dear Campers ~ 

Here's a quick recap in case you missed anything at camp last week:

Posts ~

6/8: 🔥 week 23 

6/9: paper flowers with centers 

6/10: TT plastic bottle plant irrigation 

6/11: gnocchi with sautéed vegetables 

6/12: paper flower arrangements 

6/13: friday the 13th funny 

6/14: words (unconditional love)

That's it for this week! See you next week for more projects, crafts, recipes, whatever we can think of to make at camp - bye :)


Sincerely ~

Jill
camp counselor


Thursday, June 12, 2025

Paper Flower Arrangements

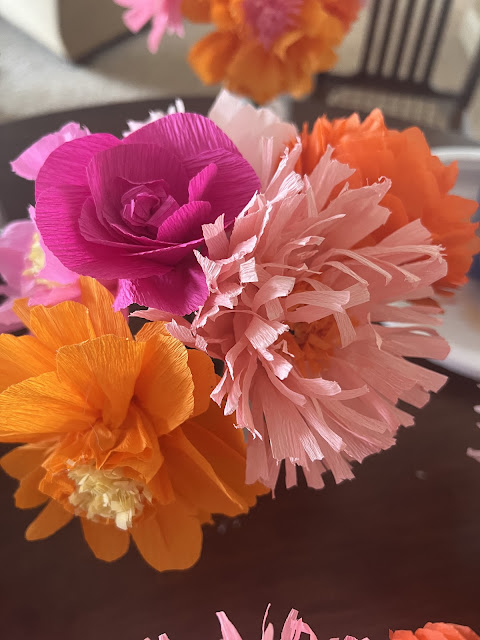
I finished helping Cathy make paper flowers for her granddaughters open house - but then she overthunk it and made them even prettier! She reworked the pedals on most of them, cutting and changing them into different shapes and textures...I said overthunk but really she was right haha, and it really made a difference! They turned out beautiful and I can't even take any credit for helping LOL. 

All of them (other than the rose) started as traditional accordion flowers, once she was done changing the pedals tho they all look like different techniques. Click here and here for 2 other posts about making paper flowers with her. 


6.12.24: chipotle-lime cauliflower bowls or tacos

6.12.23: combining dog tricks

6.12.22: 🔥 week 24

6.12.21: cauliflower pizza casserole 

6.12.20: Al and Cathy change their kitchen island