Friday, March 31, 2023

SM: 3-Ingredient Stovetop Mac and Cheese

I was super-intrigued by the technique of making this mac and cheese - you put the macaroni in a pan, barely cover with water and bring to a boil. The water gets absorbed and you don't drain it off like when you usually boil pasta - hmmm, different right? The starch in the water helps the sauce thicken. If you're familiar with microwave mac n cheese cups this reminds me of how to prepare them (fill water in the cup to the line, microwave and add the cheese packet) but this tastes so much better!! It also reminds me a bit of melted velveeta, once the cheese cools it get's really thick but I just added a little water and stirred and it got saucy again. This is a really quick, easy dish and we both loved it - I will 100% make this in the future! 

The recipe title is '3-ingredients' and I had to laugh at one of the snotty reviewers that said 'technically it's 4-ingredients' because of the salt. I almost wrote 'technically it's 5-ingredients because of the water' LOL. Made myself laugh. 

  • 6 ounces elbow macaroni (1 1/2 cups)
  • salt
  • 6 ounces evaporated milk (I used low-fat)
  • 6 ounces grated mild or medium cheddar cheese, or any good melting cheese such as Gontina, Gruyere, or Jack (I used 1/2 mild shredded cheddar and 1/2 shredded Monterey Jack)
1. Place macaroni in a medium saucepan or skillet and add just enough cold water to cover. Add a pinch of salt and bring to a boil over high heat, stirring frequently. Continue to cook, stirring, until water has been almost completely absorbed and macaroni is just shy of al dente, about 6 minutes.

2. Immediately add evaporated milk and bring to a boil. Add cheese. Reduce heat to low and cook, stirring continuously, until cheese is melted and liquid has reduced to a creamy sauce, about 2 minutes longer. Season to taste with more salt and serve immediately. 

Makes 2 generous servings - by that I mean there was enough for both of us to have small seconds with no leftovers. 

can you see the water level? it's just over top of the uncooked macaroni

PS: technically it's 6 ingredients because I added pepper 😂


recipe found here at serious eats. they have lots of info and notes if you want to read more. 


Thursday, March 30, 2023

SM: Air-Dry Clay Ornaments

Today's starch madness is a craft instead of a recipe (finally!) using cornstarch. The site where I found it  gave these directions, I took lots of pictures and notes of things I learned during the process. Oh, and I realize my coloring looks really messy - I just wanted to show what each coloring medium looked like (crayon, colored pencils, markers, craft paint), I wasn't trying very hard to make them cute LOL. 


Mix together 1 part white glue (like Elmer's) and 2 parts cornstarch (for instance 1 cup glue and 2 cups cornstarch) until a moldable dough forms. Roll out the dough and cut shapes using a cookie-cutter. Poke a hole in the shape with a skewer or pencil if you want to hang it. Use a dry paintbrush to brush away any crumbs on the dough. Set the cutout shapes on a flat baking sheet lined with parchment paper, leave them overnight to dry out. Once dried out, the hardened shape is ready to be decorated - try coloring them with colored pencils, wax crayons, or acrylic paints. Add string or a ribbon to hang. 

Sounds easy enough, right? I only wanted to make a couple ornaments so mixed together 1/3 cup glue and 2/3 cup cornstarch. I'm not sure what 'moldable dough' feels like but after I mixed the 2 together it was a ball so I turned it out onto some parchment paper to roll it out. Well it was so-so sticky that I couldn't get it off my hands to even attempt to roll it, and I worried about rolling glue with my wood rolling pin so I just tried to pat it into a flat shape best I could. Then I cut out dog shapes but when I tried to transfer them to a baking sheet they wouldn't come off the paper. Hmmm...

I tried lifting them with a thin spatula which sort of worked but the shapes were all wacky. Hmmm...

Walked away and cleaned my hands and some of the area on the counter - after a few minutes I went back to the dough that was leftover, sprinkled more cornstarch on top and rolled it back into a ball. Now that the glue had a little time to dry out, and with the extra cornstarch, I had a much less sticky ball that was firmer. And didn't stick to my hands - so I used more cornstarch like I would have used flour if I was rolling cookies and brushed it over the rolling pin and on a clean piece of parchment paper, then rolled the dough out. So much better! I could lift the shapes with no problem and they are much much better looking. 

Bottom line - these were fun to make once I learned what 'moldable dough' is like and treated it like rolling out cookies. If you make the dough and it's really sticky just add more cornstarch until you can knead it and roll it out easily. I was also able to re-roll the scraps after cutting out the shapes so I could get more out of the dough. Clean up was easy enough with soap and water, but I think I'd do this on newspaper or a drop cloth next time - I did get glue stuck to the counter, it came off but clean-up could have been easier if done on a protected surface. 


you can see how shiny the dough is in the above picture, 
this was the first attempt without enough cornstarch

add more cornstarch and now it's not shiny 
and feels more like clay

4 on the left are after adding more cornstarch,
the 2 sad ones on the right are just that - sad. 

once dried the edges curled up - maybe I rolled the dough too thin?

yeah, don't try to press the edges back down!


don't judge the coloring, I wasn't going for best results - this is just to show you what each medium looks like. From left to right - crayon, colored pencil, marker, craft paint 

crayon and colored pencils look the same

marker kept soaking in and I kept reapplying. paint would probably need a second coat

 click here for original source found at nurturestore.co.uk


3.30.22: lasagna casserole

3.30.21: TT deviled eggs (and cute deviled egg chicks) 

3.30.20: April plan


Wednesday, March 29, 2023

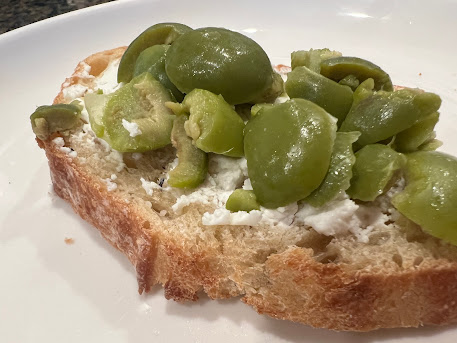
SM: Goat Cheese Toasts

I got this recipe from Ina Garten's 'Go to Dinners' - I only had a small piece of leftover baguette and made myself one piece of goat cheese toast just to try the flavor combo and really wish I had more baguette to make additional pieces! Although on second thought, if I had more bread I'd just have kept making and eating these terrific toasts, so maybe it's good I had built-in portion control. I ate the toast for lunch on the side of last week's spinach and white bean soup and oh my gosh, new favorite thing.


Now because I'm lazy and like short-cuts, I didn't follow her recipe exactly - I'll give you her recipe tho and you can modify as you like. I didn't bake the bread, popped it in the toaster oven instead; and didn't rub it with garlic but sprinkled with garlic powder. Castelvetrano olives are my favorite green olive, they are firm and have a little crunch to them but I'm sure these would be good with other kinds of green olives. 

I'm not sure my grocery store brand of olive oil would be considered 'good' to Ina, but it tastes good to me haha. I used coarse salt and coarse pepper, along with plain ol' goat cheese (not crumbles, I used it in log form).

Ina's recipe:

  • 1 fresh baguette
  • good olive oil
  • kosher salt and freshly ground black pepper
  • 1 or 2 garlic cloves, halved lengthwise
  • 8 ounces creamy goat cheese, such as Montrachet, at room temperature
  • pitted green olives, such as Castelvetrano, halved 
Preheat the oven to 400'.

Slice the baguette diagonally into twelve (1/4" thick) slices. Lay the slices in one layer on a sheet pan, brush each with olive oil, and sprinkle with salt and pepper. Bake the taste for 8 to 10 minutes, until they are browned and crisp. As soon as they are cool enough to handle, rub one side of the toasts with the cut side of the garlic clove. Let cool, then spread thee toasts with goat cheese and place the olives on top. Serve warm or at room temperature. 

She notes they're perfect to serve with drinks or as a crouton to float on top of a bowl of soup. 

Makes 12 toasts


3.29.21: Reese's bunny cars

3.29.20: ðŸ”¥week 13


3.29.17: Mark's cowboy casserole

3.29.16: make a kitchen file


Tuesday, March 28, 2023

Tip-sy Tuesday: Gluten-Free quick bread baking tips

I made a few loaves of Irish bread for St. Patrick's Day and since Macey was coming and has to eat gluten-free I decided to make a loaf for her using a gluten-free flour blend. After the pineapple-upside down cupcakes I made last week that were a little dry (I didn't know that about GF baked goods, I guess it's common knowledge but not to me!) I did a little research on what to do to help combat dryness. 

I substituted the GF flour blend for regular wheat flour and followed the usual recipe with the additions of 1/4 cup canola oil, 1/8 cup additional sugar, 1 T. extra baking powder, and a big spoonful of sour cream (probably 1/3 cup). I read to not scoop the gluten-free flour with the measuring cup but spoon the flour into the cup - I always do that anyway, but it's a good tip even with wheat flour if you don't already do that. Preheat the oven 25' lower than the regular recipe calls for, and check for doneness sooner than the standard recipe indicates. I pulled the bread out when the skewer I poked into the bread had a little loose batter on it, if it comes out clean you've probably over-baked the bread. 

I taste tested side-by-side and if I didn't know the gluten-free was gluten-free I would not have known. It was really close to the regular loaf, a touch drier but still really good. I'll continue to tweak and see if adding more oil and additional sour cream help and if so I'll post an update. But in the meantime this was a very successful remake of a wheat flour based recipe. 

I didn't take a picture of the bread because I didn't think about making a blog post out of it - but Macey sent me a picture in a text about how much of the bread she had already eaten haha so I saved it for this post. The pic doesn't do the bread justice but it wasn't meant to, at least I have one! 


3.28.22: Miss Lori's Easter porch decor 

3.28.21: ðŸ”¥week 13

3.28.20: road trip day 6

3.28.19: how to sew silverware pouches


3.28.17: DIY mod podge

3.28.16: make a zipper bracelet


Monday, March 27, 2023

SM: Black Bean Tacos

This is an interesting idea to mash and roast the black beans to mimic the texture of meat if you're wanting to cut back on your meat consumption - or just if you like black bean tacos! Usually if I want bean tacos or enchiladas I just mash the beans onto the tortillas, or use refried beans, but I'd never seen this method so figured I'd give it a try. I'm not sure I love the roasted beans only because they're a little dry - I just added some sour cream to the taco tho and fixed that little problem. 

  • 8 (6") corn or whole wheat tortillas
  • 3 T. olive oil
  • 2 Cups cooked or canned black beans, rinse and drained
  • 1 T. minced garlic
  • 1 T. chili powder
  • 1/2 t. cumin
  • 1 t. salt, plus more to taste
  • black pepper to taste 
  • 4 Cups shredded green cabbage
  • 1 red bell pepper , chopped
  • 1 fresh hot green chile (like jalapeño or serrano), minced
  • 1/4 cup chopped scallions
  • juice of 2 limes
  • 1/2 cup chopped cilantro 
Heat the oven to 400'. Coat a rimmed baking sheet with 1 T. oil. Stack the tortillas and wrap them in aluminum foil. Combine the beans, garlic, chili powder, cumin, half the salt and some pepper in a bowl. Mash the mixture with a fork or potato masher; it should still be chunky.

Spread the mixture out on the prepared pan, drizzle with another T oil. Roast, stirring a few times, until the beans are crumbly and crisp in places, 15-20 minutes. Transfer the tortillas to the oven with the beans for the last 5 minutes of cooking.

Meanwhile, put the cabbage, pepper, chile, scallions, lime juice, cilantro, remaining tablespoon oil, 1/2 teaspoon salt, and some pepper in a large bowl and toss to combine. Taste and adjust the seasoning. Divide the beans among the warm tortillas; top with the cabbage and serve.

*my notes: I used cole slaw mix; omitted the red pepper, chile pepper, and scallions. I have a ton of lemons so used lemon juice in place of lime. And spread the tortillas with a little sour cream. 


recipe found at VB6 (Vegan before 6) - but note that adding sour cream makes this non-vegan!

Sunday, March 26, 2023

🔥 Around the Campfire (week 13)

Dear Campers ~

Here's a quick recap of more 'starch madness' happening at camp last week in case you missed anything:

Posts ~

3/19: 🔥 week 12

3/20: broccoli cornbread

3/21: TT bleached vs unbleached flour

3/22: gluten free pineapple upside-down cupcakes

3/23: creamy risotto (with a new technique)

3/24: living Easter basket

3/25: words

What's Cooking ~

  • corned beef dinner (and leftovers a couple nights later)
  • grilled tuna, coconut rice, creamed spinach
  • lobster ravioli (Costco), light alfredo sauce, caesar salad
  • chicken tikka masala (Costco!), steamed rice (white for D, brown for me), roasted green beans
  • stuffed salmon, wilted spinach

That's it for this week - hope you'll stop back often to see more starchy recipes (the madness is almost over!) and whatever else I think of to make at camp. Bye!

Sincerely ~

Jill

camp counselor


3.26.20: road trip day 4

3.26.19: the front tuck

3.26.18 and 3.26.16: Peep cupcakes

3.26.17: Al's west african peanut soup (oh gosh I love this soup so much!)


Friday, March 24, 2023

Living Easter Basket

Taking another break from the whole 'starch madness' theme this month so you have time to get this project growing if you want to make a living Easter basket. 

I saw this idea in a garden book and took a picture of it in June 2019, stuck the idea in my file and forgot about it. I have no idea which garden book and don't know who to credit. Isn't this cute? I haven't made it yet but I do know that rye grass seed grows quickly - Easter is April 9th this year, so if you start soon it should be ready in time.  

I googled and found lots of different sites showing how to make a living Easter basket - here's the info I have saved but no picture:

The last week in March is the time to plant a living Easter basket. Find a pretty pastel-colored Easter basket, line it with pebbles (or a reusable plastic liner available at gardening centers) and add two inches of potting soil. Sprinkle fast-growing rye grass seed on top of the soil and then cover with another quarter inch of soil. Water well and cover with a brown paper sack for a few days until the seeds germinate. When the grass sprouts, place the basket in a warm sunny window and continue to water. In a couple of weeks you'll have a basket of living grass. Add a bow to the handle and tuck in some painted wooden Easter eggs and a small stuffed bunny for a charming springtime centerpiece This is a delightful hostess gift to make if you're expected somewhere for Easter dinner.

Here's more instructions I found at southern living (click here), along with borrowing their photo:


A lively take on the classic Easter basket. Freshen up an old basket with some easy-to-grow rye (or wheat) grass and classic colorful eggs. To make this idea come to life, fill a container with potting soil; place a very thick layer of seeds over the potting soil; place it in a sunny spot, and water daily, keeping it very moist, for 7 to 10 days; put the grass in a basket with the decorations of your choice.

Thursday, March 23, 2023

SM: Creamy Risotto (with way less stirring!)

We had a big shrimp cocktail from Costco that we weren't eating quick enough so I decided we were having shrimp something for dinner to use them up. I saw a recipe for Creamy Risotto alla Milanese and while I didn't use the same ingredients I did base this version on theirs, mostly I was interested in the technique. 

Traditional risotto isn't difficult but it is time-consuming, you add small amounts of broth to rice and stir, stir, stir; it gets absorbed and you add another small amount of broth and stir, stir, stir. You cannot really leave a pot of risotto if you are making it in the usual way. I love risotto but not enough to want to actually make it very often. So when I saw this shortcut technique of less stirring I was intrigued. 


And it works!

I'll give you their full recipe, click here for lots more details of the why and how's and notes - I'll tell you what I did following the recipe. 

  • 14 oz. (about 2 cups) risotto rice, preferably carnaroli or vialone nano
  • 4 cups homemade or store-bought low-sodium chicken stock or vegetable stock, plus more as needed
  • 3 T. extra-virgin olive oil
  • 1 small yellow onion, minced 
  • 1 cup dry white wine
  • 2 generous pinches saffron
  • kosher salt
  • 2 T. unsalted butter
  • 1 1/2 ounces freshly grated Parmigiano-Reggiano cheese, plus more for serving
  • 1/2 cup heavy cream, whipped to stiff peaks (optional)

1. Combine rice and stock in a large bowl. Agitate rice with fingers or a whisk to release starch. Strain through a fine-mesh strainer set over a 2-quart liquid cup measure or large bowl. Allow to drain well, shaking rice of excess liquid.

2. Heat oil in a heavy 12-inch sauté pan over medium-high heat until shimmering. Add rice and cook, stirring and tossing frequently, until all liquid has evaporated and rice sizzles and takes on a nutty aroma, about 5 minutes. Add onion and continue to cook, stirring frequently, until aromatic, about 1 minute. Add wine and cook, stirring occasionally, until the pan is nearly dry, about 3 minutes.

3. Give reserved stock a good stir and pour all but 1 cup over rice. Add saffron and a large pinch of salt, increase heat to high, and bring to a simmer. Stir rice once, making sure no stray grains are clinging to side of pan above the liquid. Cover and reduce heat to lowest possible setting.

4. Cook rice for 10 minutes undisturbed. Stir once, shake pan gently to redistribute rice, cover, and continue cooking until liquid is mostly absorbed and rice is tender with just a faint bite, about 5 minutes longer.

5. Remove lid. Stir remaining 1 cup of stock to distribute starch, then stir into rice. Increase heat to high, add butter, and cook, stirring and shaking rice constantly until butter has melted and rice is thick and creamy; add more stock or water as necessary if risotto becomes too dry. Off heat, add cheese and stir rapidly to thoroughly incorporate. Fold in heavy cream, if using. Season with salt. Serve immediately on hot plates, passing more cheese at the table.

My notes: I used Arborio rice, omitted onion and saffron, and didn't add the cream. Once the risotto was done I added the cooked cocktail shrimp (no shells or tails) and covered the pan for a couple minutes until the shrimp were heated thru. 
don't skip this step of rinsing the rice in the broth, 
the starch from the rice will help in making the 
creamy risotto

toast the rice in the pan before adding liquid


3.23.22: parmesan coated potato wedges

3.23.20: road trip day 1

3.23.19: herb crusted buttermilk chicken

3.23.18: perler bead Easter eggs

3.23.17: a laugh

3.23.16: Easter side dishes - pineapple stuffing, creamed new potatoes, roasted carrots


Wednesday, March 22, 2023

SM: Gluten-Free Pineapple Upside Down Cupcakes

Macey can't eat gluten so has been shorted on getting goodies from me, when I saw a gluten-free cake mix at the grocery store I thought I'd give it a try and make her pineapple upside-down cupcakes (I was going to make a whole cake and cut out a piece for us to try before giving the rest to her but that's kinda rude hahah - cupcakes allows me to try them without anyone noticing!), I've not experimented with gluten-free baking and learned a couple things. 

Sidenote: I'm not sure if cupcakes are considered a 'starch', more like a sweet/sugar, but since this gluten-free mix includes brown rice flour, potato starch, and tapioca starch - and I'm doing starch month - I'm including it!

I followed the directions on the box except I replaced half of the milk with pineapple juice. The box said to bake for 28-34 minutes and that seemed way too long to me for cupcakes so I set the timer at 15 minutes thank goodness - they actually felt a little over-baked to the touch at 15.

To make the cupcakes: spray a 12-cup muffin tin with nonstick spray. Cut 1/2 stick butter into cubes, put an even amount of cubes into each muffin cup. Turn on the oven to 350' and put the tin into the oven as it's heating. Pull it out when the butter is melted and add 1 teaspoon brown sugar to each cup. Let the sugar melt a bit and stir it into the butter. Put a maraschino cherry in the center of each cup, surround it with pieces of pineapple (or I like to use crushed but didn't have that on hand), set aside until you make the cake batter. 

Once you've mixed the batter, spoon it evenly overtop the fruit. Bake in preheated oven for less than 15 minutes, next time I'll check them at 13 minutes. When done, turn out onto a cooling rack. 


Macey was super surprised and happy, she sent me a video of her eating one as soon as Dave delivered them and before he even left the driveway haha. She texted this instant review: 

Oh my gosh, they’re so good! If you didn’t know they were gluten-free, you probably wouldn’t have known it. It is so very similar to regular pineapple upside down cake. Honestly, they are a little more dry then normal, but that’s not you that’s the cake. And it’s missing the binder a.k.a. the gluten so it actually is a little more dry naturally. All of the breads and stuff aren’t as moist but 🤷‍♀️ I’ve been eating this way for a while now, I feel like I’m finally acclimated to the taste of gluten-free… seriously, thank you so so much! 

update 3/23/23: I've learned since making these that there are some things you can do to help with the dryness of gluten-free things like adding more fat, baking at a lower temp, and adding plain greek yogurt or sour cream. I'll post more about this in a few days but wanted you to have the info sooner if you want to make these ahead of time!


Tuesday, March 21, 2023

SM/Tip-sy Tuesday: bleached vs unbleached flour

Today's Tip-sy Tuesday tip is about the difference between bleached and unbleached flours - I'd never really given this much thought and have bought both without thinking they aren't the same. Here's some info, just FYI: 

Bleached and unbleached flour are both milled flour; the difference is how they're produced. All milled flour will bleach, or turn white, on its own when allowed to stand exposed to air (unbleached flour). Because this takes time, bleaching agents such as chlorine dioxide and benzoyl peroxide are added to the flour. The resulting bleached flour is more white in color and has a slightly softer texture. If you're buying unbleached flour, it's just skipped the step of the added chemicals and is naturally aged after milling. Unbleached flour will have more of an off-white or yellow tint that fades into lighter white color as it's exposed to oxygen.


Bleached flour and unbleached flour can be used interchangeably in recipes. However, baked goods made with bleached flour contain proteins that have been altered, which helps in forming gluten bonds when baking. For example, the more glutinous your bread dough is (from using bleached flour), the easier it will be to handle because it's less sticky. The result will also have more volume and texture, whereas a loaf made with unbleached flour might be a bit denser. Those with a sensitive palate may also taste a slight difference if bleached flour is used (due to the chemicals added), but otherwise, the flavor will turn out the same.

found here  at bhg.com


3.21.22: large dish microwave cozies

3.21.21: ðŸ”¥ week 12

3.21.20: shrimp salad


3.21.19: Jen's Hello Fresh Update


3.21.17: watch Mark from Paul's Photo talk about framing your photos and prints

3.21.16: 2 different bunny cakes for Easter and Spring

Monday, March 20, 2023

SM: Broccoli Cornbread

This cornbread with broccoli sounds a little weird, I know - but Dave and I both really liked it and it'll go into the 'make again' file. I served it with grilled chicken and a chopped salad, and ate leftovers for breakfast with a basted egg on top and that was good too (yep, also a little weird but that's me haha). 


I cut the ingredients in half and baked in a small baking dish instead of a skillet, and baked it for about 20 minutes until baked thru and lightly browned. Brush the melted butter up the sides of the dish a bit, or spray with non-stick cooking spray. The batter is super thick and I had to press it into the pan with a spatula (well I actually did it with my hands but that sounds a little gross haha). 


  • 2 eggs
  • 1 cup 4% cottage cheese
  • 3 cups frozen chopped broccoli, thawed
  • 3/4 cups chopped onion 
  • 1/2 cup melted butter, divided
  • 2 packages (8.5 oz. each) cornbread mix
Combine eggs, cottage cheese, broccoli, onion, 6 T. butter, and cornbread mix until well blended. Pour remaining butter into a 10" oven-proof skillet, add batter. Bake at 350' 40-45 minutes or until golden. Cut into wedges and serve warm. 


found here at taste of home 

3.20.22: ðŸ”¥ week 12

3.20.21: corned beef and cabbage soup

3.20.20: pork chops with sauerkraut 

3.20.19: peanut blossom cookies

3.20.18: Dottie F. Bunny (Mary knitted it for me, so cute and so much work!)

3.20.17: how to hinge mat your photos or artwork

3.20.16: boneless coq au vin


Sunday, March 19, 2023

🔥 Around the Campfire (week 12)

Dear Campers ~

Here's a quick recap of what happened at 'starch madness' last week in case you missed any starchy goodness:

Posts ~

3/12: 🔥 week 11

3/13: carrot candy

3/14: TT: starchiest food list

3/15: irish soda bread

3/16: deco mesh wreath

3/17: crock pot baked ziti

3/18: words

What's Cooking ~

  • JAR pot roast, mashed potatoes, roasted carrots, horseradish sauce (I added some photos and notes to the original pot roast post if you want to see the updates)
  • crock pot baked ziti, salad
  • leftovers from both the above dinners!
  • tuna noodle casserole 
  • creamy risotto with shrimp, steamed spinach

That's it for this week, hope you'll check back often for more recipes (lots of recipes this month!) and maybe a craft or two. Bye!

Sincerely ~

Jill

camp counselor


Friday, March 17, 2023

Crock Pot Ziti (meat optional)

I made this for dinner the other night, mostly because I wanted to see what cooking dried pasta in the crockpot would be like. I am very on the fence about the results - yes thee pasta cooked in the sauce but it went from almost done to over-done in a few minutes! So it wasn't 'al dente' by any means so that made the texture off for me, but everyone else seemed to like it and Dave even requested leftovers for the next day which he rarely does. If I make it again this way I will keep a much closer eye on it. I think my mistake was turning it to the warm setting instead of serving it right away.
 

This might seem a little complicated because of how long I'm making this post, but stick with me - it's actually really easy I'm just giving you some options:

1) You could skip doctoring the jarred marinara sauce and just use it as is along with the cheese mixture and uncooked pasta in the crock pot, add a little water tho to make sure all of the noodles are covered. 

2) I browned the sausage links in a pan until brown on all sides, remove from the pan and then continue with making the sauce. Put the sausage and frozen meatballs in the sauce once you have it made and it's simmering on the stove until the sausage is cooked thru. I served the meat in some sauce on the side instead of adding to the crock pot. 

3) If you add meat to the sauce - when you're ready to put the ingredients into the crock pot, scoop sauce from around the meat and transfer it to the crock pot. I did it this way to flavor the sauce but you can skip this step! Or put one jar of sauce in a pan with the meat, and use one jar of sauce for the crock pot pasta. 

This makes a lot of sauce, enough for the crock pot pasta with plenty leftover to serve on the side with or without the meat. 

  • 1 lb. Italian sausage links, cut in half, optional 
  • 1 small bag frozen meatballs, optional 
    • 1 T. oil 
    • 1/2 onion, finely chopped 
    • 8 oz. sliced mushrooms
    • 1/2 t. garlic
    • 2 jars marinara sauce
    • 16 oz. tomato sauce
    • 1 (15 oz.) can diced tomatoes
    • 1 small can tomato paste
    • 2 t. Italian seasoning
    • 2 (15 oz) cans water
    • 2 T. sugar
    • salt and pepper to taste
    •  1/2 (15 oz.) container whole-milk ricotta cheese
    • 4 oz. cream cheese, softened
    • 1/4 cup sour cream
    • 1 t. Italian seasoning 
    • 1/2 t. crushed red pepper flakes, optional 
    • salt and pepper to taste
    • 2 cups uncooked ziti
    • 1 cup grated parmesan cheese, plus additional for serving if desired
    Make sauce: if you are using the sausage - in a large pot brown the links on all sides and remove from the pan. Cook the onion, mushrooms, and garlic in a little oil in the same pan for a couple minutes until softened. Add marinara sauce, tomato sauce, canned tomatoes, tomato paste, Italian seasoning, 2 cans of water, and sugar; stir to combine. Add salt and pepper to taste. Let in simmer for as long as you want to blend the flavors. You can use it immediately if you want, or let it hang out on the stovetop for an hour or two. If adding the meat, put the links and meatballs into the sauce and cook until the sausage is no longer pink and the meatballs are heated thru.

    Using an electric mixer, combine ricotta cheese, cream cheese, and sour cream. Add seasonings.

    Put a layer of sauce into the bottom of a 5-quart crock pot. Top with about 1/3 of the uncooked pasta. Add 1/2 of the ricotta mixture and spread over the sauce. Sprinkle with some parmesan. Add another layer of sauce, 1/3 of the uncooked ziti, and the remaining ricotta mixture spread evenly. Sprinkle on the remaining 1/2 cup parmesan. Add remaining uncooked pasta, top with remaining sauce. Make sure the noodles are completely covered by the sauce so they'll cook correctly. 

    Cover with lid and cook on HIGH for 2 - 2 1/2 hours, or LOW for 3 1/2 - 4 hours, or until pasta is tender.