Wednesday, July 31, 2024

7/31 ~ Thru the Years

Catching the blog up from missing a few days - here's what happened on this day thru the years:

7.31.23: watch strap loops

7.31.22: ðŸ”¥ week 31

7.31.21: Al's baked beans (re-run)

7.31.20: album cover t-shirt

7.31.19: mexican street corn salad

7.31.18: freezing pesto

7.31.17: boho earrings 

7.31.16: Al's baked beans are the best!

Tuesday, July 30, 2024

7/30 ~ Thru the Years

Catching the blog up from missing a few days - here's what happened on this day thru the years:

7.30.23: ðŸ”¥ week 31

7.30.22: angry balls cocktail

7.30.21: harvey wallbanger

7.30.20: beef wellington

7.30.19: tt - guacamole toast

7.30.18: road trip bracelets

7.30.17: spinach, beet, goat cheese salad

7.30.16: harvey wallbanger


Monday, July 29, 2024

Wood Candleholders

I am finding so many long-forgotten crafts while cleaning out my closets! I used to LOVE making these candleholders and don't know why I stopped making them - most likely because I made some for everyone I knew and ran out of reasons to make more hahahha. This project is especially fun because you paint and glue together different wood shapes to build the candleholder exactly how you want, there are so many different wood shapes available that your options are endless!

Here are a few that I found in my stash along with one finished holder - I wouldn't necessarily paint them this way now, my tastes and colors have changed, but these are good examples of what you can do by stacking up the different pieces. I paint them individually before gluing them together, you could certainly build your candleholder and then paint it after it's assembled. 


7.29.23: words

7.29.22: golf banquet


Sunday, July 28, 2024

🔥 Around the Campfire (week 30)

Dear Campers ~ 

Here's a quick recap in case you missed anything at camp last week:

Posts ~

7/21: 🔥 week 29

7/22: pop tab earrings (happy 21st to Gracie!)

7/23: TT ginger 

7/24: baked boneless chicken thighs

7/25: wood block stack

7/26: gluten free chicken pizza by Macey

7/27: words

That's it for this week! See you next week for more projects, crafts, recipes, whatever we can think of to make at camp - bye :)


Sincerely ~

Jill
camp counselor


Friday, July 26, 2024

Gluten Free Chicken Pizza by Macey

My niece sent me this picture of pizza she made - she has to eat gluten free but these toppings would be great on the crust of your choice (well, at least the toppings sound great to me haha)! Thanks for sharing, Mae! Here's what she did, in her words:

I’ve been buying pre-baked gluten free crusts sold at world market for $8 - 3 in a pack.  Last night I cut up some rotisserie chicken, mozzarella cheese, sautéed mushrooms, basil, just regular canned spaghetti sauce, chili flakes, and a couple dollops of this eggplant Parmesan red pepper spread I put on pretty much everything 😅 


Thursday, July 25, 2024

Wood Block Stack

This is a project I've had on hand for a couple years and haven't made - came across it while cleaning out the craft room and since I've stored it for so long I decided to put it in the Goodwill pile so someone else can enjoy making it! This came from one of Ronda's Stampin' Up classes, thought I'd share the idea in case you'd like to get the supplies and make this wood block stack. 

She covered 4 wooden blocks with decorative paper, cut to fit each side and glued on. Her kit included a heart (representing the letter 'O') and the letters H, M, E, L, V, N - attach one letter to 3 blocks and the heart to the fourth. With her letters you could spell "home", "love" or "noel" but you can obviously choose whatever letters and words you want to spell! 


7.25.22: star plates

Wednesday, July 24, 2024

Baked Boneless Chicken Thighs

I forgot to take a picture of these baked chicken thighs, we really liked them with this flavorful spice mixture and it's a very easy dish to make. I served with a flavored rice packet and roasted broccoli.


  • 2 pounds boneless skinless chicken thighs 
  • 2 tablespoons olive oil
  • 1 teaspoon Diamond Crystal kosher salt or ½ teaspoon of any other salt
  • ¼ teaspoon black pepper
  • 1 teaspoon garlic powder
  • 1 teaspoon onion powder
  • 1 teaspoon smoked paprika
  • ½ teaspoon ground cumin
  • ¼ teaspoon cayenne pepper

Instructions

  • Preheat your oven to 400°F. Place the thighs in a large bowl. 
  • Add the olive oil and spices. Use your hands to coat the chicken pieces. 
  • Arrange the seasoned thighs in a single layer on a rimmed baking dish, such as a 9 X 13-inch baking dish. If there's some residual oil and spice mixture in the bowl, brush it on the chicken pieces. 
  • Bake until the thighs are cooked through, juices run clear, and an instant-read thermometer inserted into the middle of the largest thigh reads 165ºF. In my oven, this takes about 30 minutes. 
  • Serve immediately.


recipe and more info found here at healthyrecipesblogs.com 


7.24.23: reusable kitchen sponges

7.24.22: ðŸ”¥ week 30 

7.24.21: Cathy's peach cobbler

7.24.20: tuna cauliflower salad


7.24.16: Nuremberg


Tuesday, July 23, 2024

Tip-sy Tuesday: Ginger

 In case you haven't worked with fresh ginger I thought I'd share a couple tips:

1. when buying ginger you don't have to purchase the whole giant piece, you can break off what you need (at least that's what I do and no one has ever told me that it doesn't work that way haha)

2. peel off the outer brown skin using a small paring knife, the ginger is knobby so just make small cuts trying to only remove the outer part. I've seen a technique to peel it using a spoon but I've never done that. You could use a vegetable peeler but it's hard to work it around all the bumps.  

3. to grate the ginger for recipes like this one for PF Chang inspired lettuce wraps,  I run it along a microplaner, if you have a different grater use it, like you would grate carrots or whatever, if the pieces are large tho I would then mince it up with a knife. The microplaner lets you get really small pieces. 


Monday, July 22, 2024

Pop Tab Earrings by Gracie

Today is my niece Gracie's 21st birthday, I'm reposting this cute jewelry craft she shared with me back in '20 in her honor. Happy Birthday G!! 


Materials

Pliers, soda tabs, earring loops and chain the length you want your earring to hang

First you're going to need to open up a chain link on both ends

Then put the tabs in one of the open links, then put the earring loop in the other (or if you don't want them to dangle on the chain just put the tabs and the earring loop in the same open link)


Close that bad boy up and boom - you got a cute earring 


Jill here - last time I saw G she had on one pop top earring and one zipper pull earring and I loved how original and hip she looked! Whodathunk to make cool earrings from pop tabs?!

Sunday, July 21, 2024

🔥 Around the Campfire (week 29)

Dear Campers ~ 

Here's a quick recap in case you missed anything at camp last week:

Posts ~

7/14: 🔥 week 28

7/15: santa cinnamon sticks

7/16: TT how to squeeze dry spinach

7/17: thru the years

7/18: boiled beets and greens

7/19: Mexican meatloaf pie

7/20: words (be teachable)

I have been really behind the last couple weeks, and not just with my posting - check out how many unread emails I have, it's giving me such anxiety! I'm forcing myself to sit down and clean them off this afternoon 🙄

That's it for this week! See you next week for more projects, crafts, recipes, whatever we can think of to make at camp - bye :)


Sincerely ~

Jill
camp counselor


Friday, July 19, 2024

My Niece (and Sister too!) is Hungry: Mexican Meatloaf Pie

This recipe is in my folder of things to try, I ripped it out of a magazine and of course have no idea which one! Sorry I can't give its creator credit. I thought I was just making it for my sis (I haven't done a 'My Sis is Hungry' in a long time!) and for Mickey's family thinking Dave wouldn't like it - but I had enough ingredients to make 3 pans so we had it for dinner as well (and he did like it so I was wrong haha). 

Here's Mickey's review:


This is my first, and hopefully not last, time experiencing the “my sister is hungry” series… though technically I would be niece… but nonetheless, we got to try Mexican meatloaf. Personally, I LOVED it. I added a little bit of sour cream and did not add the crunchy toppings (chips or Fritos). It wasn’t greasy like normal meatloaf, probably due to the turkey instead of ground beef, so it just overall felt much healthier but just as filling. Overall, I highly recommended. My husbands review is he would have preferred ground beef over the “froo froo” turkey (whatever that means!) He also said he loved his with chips and Fritos for that extra crunch, and overall it had a lot of really great flavor. The last critic in our house, may be the pickiest of all… our ten month old baby absolutely devoured hers both for dinner and for leftover the next day. Judging from the limited amount that she fed to our dog, I would say it was a hit! We would absolutely eat it again!  

And here's what my sister has to say:

So.. let me start with saying that I LOVE Meatloaf.  My sister asked if she could make it with turkey and I LOVE when anything is being made “healthier” so of course I was all for that. (even if I would never say no to anything she wants to make with ALMOST any ingredients. Haha).  

Even though this wasn’t actually meatloaf in the traditional sense It tasted exactly like I thought it would with this name.  I loved that it had everything in one dish. (similar to a casserole).  It had the meat, corn etc. all in one.  Love that.  it had pretty decent flavor but still felt to me like it needed some kind of sauce on it.  The husband chopped his up and poured Ortega on it.  that was just too mushy for me.  I ate mine more in a lump- but did add sour cream on it.  that was delish.  My sister did say put chips/fritos on the top- I added that and it was fine.  Didn’t need the chips so I’d rather spare the calories.


All in all I liked this one.  Not giving the highest marks but if its easy (haven’t looked at the recipe yet) then I would make it again.


DEEP-DISH MEXICAN MEAT LOAF PIE

makes 6 servings

  • 1 1/4 pounds lean ground beef
  • 1 cup finely crushed tortilla chips or corn chips
  • 1 envelope (1 oz.) onion soup mix
  • 3/4 cup bottled taco sauce
  • 2 eggs, lightly beaten
  • 1/2 teaspoon black pepper
  • 1 (8.8 oz) punch cooked Spanish-style rice
  • 1 (15.5 oz) can golden hominy, rinsed and draineed
  • 1 (14.5 oz) can diced tomatoes and green chiles, drained
  • 1 cup shredded pepper Jack cheese (4 oz.)
  • 1/2 cup fresh anaheim pepper, seeded and chopped
  • 1/4 cup chopped fresh cilantro
  • tortilla or corn chips and/or fresh cilantro for serving, optional
1. Preheat oven to 350'F. Combine beef, crushed chips, soup mix, 1/2 cup of the taco sauce, 1 egg, and black pepper. Press mixture into the bottom and up the sides of a 10" deep-dish pie plate.

2. Heat rice according to package directions. In a large bowl combine rice, hominy, tomatoes, cheese, anaheim pepper, cilantro, remaining 1/4 cup taco sauce, and remaining egg. Spoon mixture into meat shell. Place pie plate on a baking sheet. Cover loosely with foil.

3. Bake for 40 minutes. Remove foil and bake 20 minutes more. Let cool 15 minutes. Top with additional chips and/or cilantro if desired. Cut into wedges.

My Notes:
  • I substituted turkey for the beef
  • I used both tortilla chips and corn chips because I couldn't decide which would be better haha.
  • I used mild taco sauce for ours and Mickey's, medium for Jens.
  • couldn't find hominy so substituted with corn
  • I used shredded Mexican blend cheese instead of pepper jack
  • omitted the anaheim pepper
Funny - I also topped mine with sour cream feeling like it needed a little sauce or dip. We really liked this one and I would make it again, I'll try ground beef next time and update this post if there's much difference. 

7.19.23: MSIH: chicken cobbler


Thursday, July 18, 2024

Boiled Beets and Greens

Kyle gave me some beets from their garden and told me that he boils them whole with the greens attached so I thought I'd give it try - they turned out great and it's easy to do. There's a little bit of work involved but it's not hard. Wash the beets and greens thoroughly to remove all the dirt, put in a large pot and cover with water. Boil until you can pierce them with a fork (like checking if boiled potatoes are done). Drain. Let them cool until you can handle them, then remove the peel by rubbing off with a paper towel (or peel with your fingers). Cut off the greens, I chopped them up into bite-sized pieces and ate them as a side dish, they reminded me of a cross between spinach and swiss chard and are delicious! Ok, that's not exactly true - I initially ate a bowl of them at 9:00 at night as a bedtime snack and then the next day I ate them as a side for dinner haha. I added a little butter, salt and pepper and loved them. After removing the greens, trim the tops of the beets so they are smooth. That's it. Now they are ready for however you want to use them - cold beet salad with spinach and goat cheese is one of my favorites, but I love beets every way I've ever had them! Thanks again Kyle!


7.18.22: RV - organizing the hold
7.18.21: ðŸ”¥ week 29
7.18.20: ding dong ditch
7.18.19: msih - mexican stuffed peppers
7.18.18: Cathy's strawberry pie (so good!!)
7.18.17: tip to keep off the shoulder tops off the shoulder!
7.18.16: Jen's tip for washing baseball hats

Wednesday, July 17, 2024

Tuesday, July 16, 2024

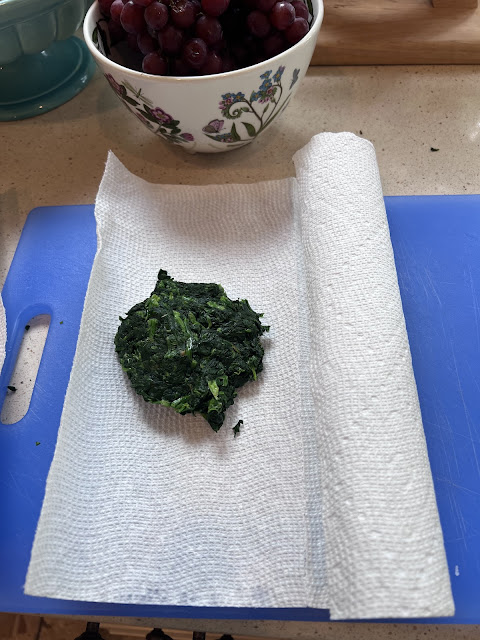
Tip-sy Tuesday: squeezing spinach dry

"Squeezing spinach dry"? That's a dumb post name but really, that's what the tip is so that's what I'm calling it hahahha.

I posted make ahead spinach manicotti and it says to 'thaw and squeeze dry' - you want the spinach as dry as possible so it doesn't add liquid to the recipe. To do that I first squeeze it between my palms to get as much water out as possible that way, and then press it between paper towels to really get it dry. 


Monday, July 15, 2024

Santa and Mrs.Claus Cinnamon Sticks

Found these cute cinnamon sticks in my craft stash - I didn't make them and I probably put them in my craft room instead of with my Christmas decorations thinking I'd use them as inspiration to make my own...and never did. So at the risk of never getting around to making and blogging them, I'm just sharing the project with you so you can have the idea if you want to make some! Christmas in July (so I don't forget to share closer to Christmas time haha).


I Googled and there are lots of images for this project - it seems the hair and beard might be made using snow effect craft paint. 


Sunday, July 14, 2024

🔥 Around the Campfire (week 28)

Dear Campers ~ 

Here's a quick recap in case you missed anything at camp last week:

Posts ~

7/7: 🔥 week 27

7/8: crochet bowl

7/9: TT brownie knife 

7/10: make-ahead spinach manicotti 

7/11: thru the years

7/12: glass gem personalized magnets 

7/13: words (cat with spiderweb)


That's it for this week! See you next week for more projects, crafts, recipes, whatever we can think of to make at camp - bye :)


Sincerely ~

Jill
camp counselor


Friday, July 12, 2024

Glass Gem Personalized Magnets

Yet another project I came across while cleaning out my craft room that I forgot about - and really easy to make. I went thru a phase where I made personalized sets of magnets as little gifts, wonder if anyone still has theirs haha. It's been a while. 

I cut out people, events, pictures and sayings from multiple sources such as photographs (I print the images onto regular copy paper), magazine pages, decorative paper, whatever you want. Cut to fit on either jumbo 1" or smaller 3/4" glass gems that are flat on one side. Brush the image with mod podge or thin glue that will dry clear, stick to the flat side of the gem. Hot glue a small magnet to the back. 


These are cute presented in a small metal tin like Altoids, I just cover the lid with something pretty like decorative paper for gifting. 


7.12.23: olive burgers


Thursday, July 11, 2024

7/11 ~ Thru the Years

The week got away from me again and I don't have a post for today - so let's revisit what happened in years past on this date!


7.11.23: boom boom sauce

7.11.22: window shadow box

7.11.21: ðŸ”¥ week 28


7.11.19: mnih (my niece is hungry!): oslo pasta bake

7.11.16: coco lopez

Wednesday, July 10, 2024

Make-Ahead Spinach Manicotti

I made this for Sunday supper and it was a hit! Not hard to do, but it does take a little time filling each manicotti shell. One tip that makes filling them easier is to put it in a ziplock bag, snip a little corner off and then insert it into a shell, squeeze lightly until the shell is filled. I served the manicotti with meatballs cooked in red sauce, crusty bread, and salad bar. Yum. 

  • 1 (15 oz) carton ricotta cheese
  • 1 (10 oz.) package frozen chopped spinach, thawed and squeezed dry
  • 1 1/2 cups (6 oz.) shredded part-skim mozzarella cheese, divided
  • 3/4 cup shredded parmesan cheese, divided
  • 1 egg
  • 2 t. minced fresh parsley
  • 1/2 t. onion powder
  • 1/2 t. pepper
  • 1/8 t. garlic powder
  • 2 jars (28 oz. each) spaghetti sauce 
  • 1 1/2 cups water
  • 1 (8 oz.) package manicotti shells
In a large bowl combine ricotta, spinach, 1 cup mozzarella, 1/4 cup parmesan, egg, parsley, onion powder, pepper, and garlic powder. 

In another bowl combine spaghetti sauce and water; spread one cup of sauce in an uncreased 13x9" baking dish.

Stuff uncooked manicotti with spinach mixture; arrange over sauce. Pour remaining sauce over manicotti. Sprinkle with remaining mozzarella and parmesan. Cover and refrigerate overnight.

Remove from the refrigerator 30 minutes before baking. Bake, uncovered, at 350' for 40-50 minutes or until heated through. 

Makes 6-8 servings